I'm sure a lot of you have seen this before and its a really powerful tool. I'm referring of course to the ability to have "Family Type" parameters in a family for nested sub components.
What does that mean?
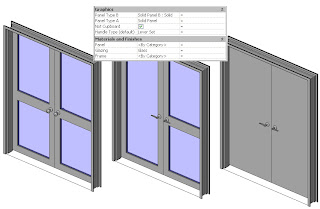
It means you have a single door where you can swap out the panel, or handles or frame. This avoids you having many different door families to achieve the same thing. It also means you don't have to load in 15 different families into your project, instead you may only need 2 or 3 and thus its better for file size.
Flexibility is a great thing.
So how do you make one of these parameters?
Well the key thing to having this work correctly is that all the sub-components that you wish to swap out must have the same insertion/origin point and be constrained by that point.
Begin with a template:
Start with a "non-hosted" generic model family template (remember you can always change the family category later).
Now we need to set the "defines origin" reference planes in the X, Y and Z planes.
My template for door panels is setup as follows:
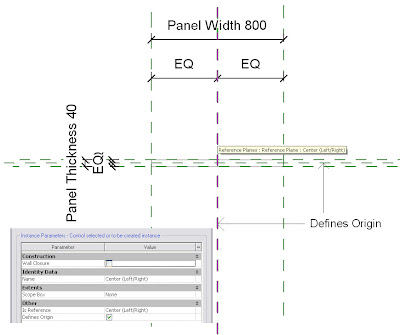

So my defining origin points are the Bottom Reference Plane (note I set it to be "Is Reference = Bottom), Centre Left/Right & Centre Front/Back.
Make note of this as when you load this panel into your project you need to define it by these points.
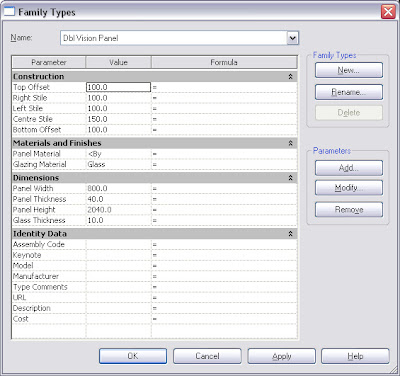
These are the parameters I include in the door. Note I have parameters to control vision panels if they exist. This way I have even more flexibility...
So once you've finished you need to load your panels into the host door family.
NOTE: This is personal preference, but I leave my door panels as generic models and set my door hardware to Furniture category.
DO NOT load lots and lots of door types into the one family. If you load too many your family will become too large and take ages every time you want to make a change to it. Load your standard door panels (most commonly used) only. I then have a subfolder that has an extensive library of door panels & hardware that I only load in on a per project basis...
Now we need to setup the host family.
Start with the Door Template. As a general rule I always delete the existing trim extrusions and remove their associated parameters. The other change I make is to the Width & Height parameters. In the template the height and width parameters are actually associated to the opening... I don't like this, I prefer to use the "Rough Height & Rough Width" parmeters for the opening sizes and then use the Width and Height Parameters for the panel sizes. So change this if you agree with my logic (just select the Width dimension and change it to Rough Width in your options bar pull down)
The next thing I'll do is load the panels that I want in the door family.
Upon doing this I immediately link through the parameters for every door type I loaded...

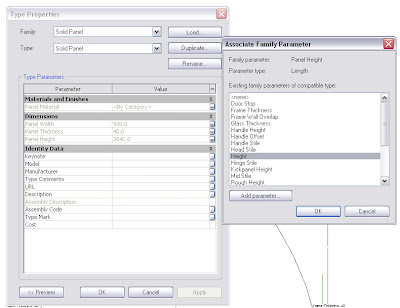 This is the labourious part. Go to each type you loaded in the project browser, go to the element properties for each one, then link through all the parameters by clicking the "link" column for each parameter. For the first one you will need to use "Add Parameter..." for the ones that don't exist yet. Then after this you can just pick them. Note I link Panel Width & Panel Height to Width & Height respectively. (note for double doors I don't do this because I have extra parameters for each door panel, left/right).
I then go to plan view and place one of the door panels randomly. I then constrain its left/right location using its centre left/right origin point (use the align tool and then lock it). I then constrain its front back location using its Centre front/Back origin point.
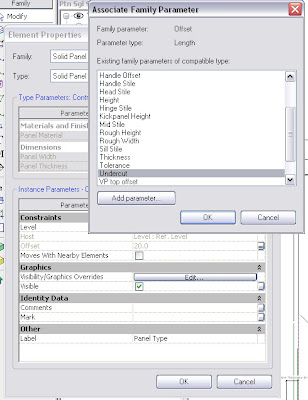
I generally have an undercut parameter so to constrain the Door in the Z axis I go to element properties and in the instance parameters I'll link the level offset parameter to my undercut parameter...
So we've now constrained the panel in the X, Y & Z axes which was the insertion point of the panel.
Now we need to add the Family Type parameter to enable us to swap out the panel for the other loaded panels...
Select the panel you placed. Look at your options bar
 You see there is drop down called label and its currently set to "None". Select "Add Parameter", give it a name and your done.
If you load this door into a project you now have a parameter that enables you to swap out the panels as needed.
Now this quick tutorial didn't really go into the depth of creating a door it was more to concentrate on the parts that are required to successfully create a working "Family Type" parameter.
I hope someone finds this useful.
Post if you have queries, as I'll add more detailed info if it proves people still have trouble.
Cheers.

