Okay, so we can't yet make elevations look the way we want them to. This is my typical workaround that i use in my office where the elevation appearance is critical (functionally you are still better using the elevations).
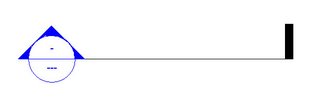
Begin with a standard section:
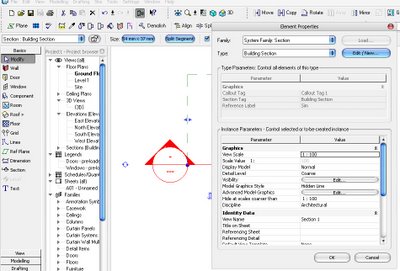
Now select it and go to its properties and choose Edit/New:
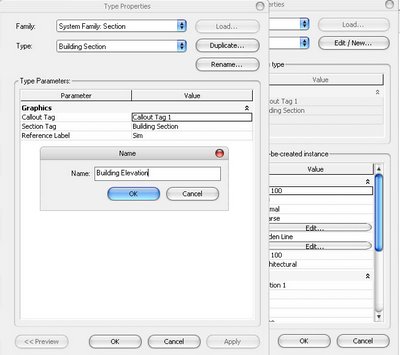
Now we want to duplicate this section type and call it "Building Elevation" for example:
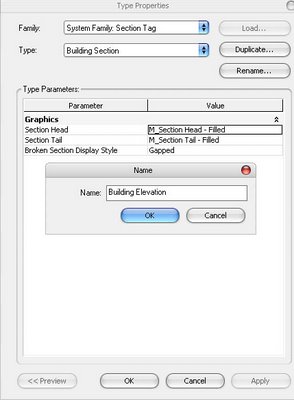
Now if we Okay out of each of these windows and goto our Settings-->View Tags-->Section Tags... Settings, we can create a new section tag type called Building Elevation and set it to have Section Tail = none:
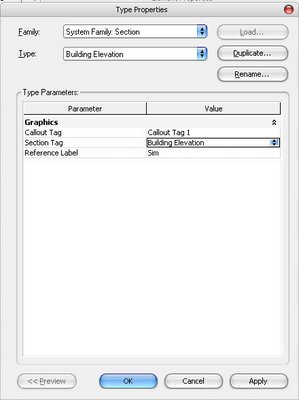
Now we need to select our section and go to its properties and tell it to use this new section tag type that we have created:
We should now have a section that uses the Section-Building Elevation type and it doesn't have a tail:

Now if we select this section again, and drag the section line end point back to the head, MAKING SURE TO LEAVE A SMALL EXTENSION PAST THE HEAD (otherwise we'll have difficulty actually using the section/moving it etc):
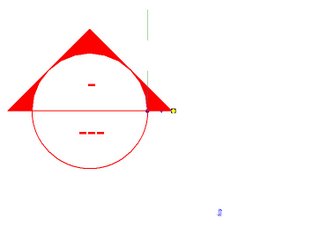
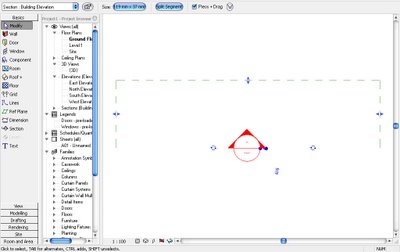
Finally its just a simple matter of adjust the sections crop regions so the head is roughly centred. Now we have a section tag that looks like an elevation marker and still has much of the same functionality. However it now looks how we want it to and all information (detail number/sheet number etc) are displayed within the actual marker, unlike elevation tags.
Begin with a standard section:

Now select it and go to its properties and choose Edit/New:

Now we want to duplicate this section type and call it "Building Elevation" for example:

Now if we Okay out of each of these windows and goto our Settings-->View Tags-->Section Tags... Settings, we can create a new section tag type called Building Elevation and set it to have Section Tail = none:

Now we need to select our section and go to its properties and tell it to use this new section tag type that we have created:

We should now have a section that uses the Section-Building Elevation type and it doesn't have a tail:

Now if we select this section again, and drag the section line end point back to the head, MAKING SURE TO LEAVE A SMALL EXTENSION PAST THE HEAD (otherwise we'll have difficulty actually using the section/moving it etc):

Finally its just a simple matter of adjust the sections crop regions so the head is roughly centred. Now we have a section tag that looks like an elevation marker and still has much of the same functionality. However it now looks how we want it to and all information (detail number/sheet number etc) are displayed within the actual marker, unlike elevation tags.

21 comments:
Just curious: Cool colors! How did you achieve the bullnose buttons in the dialog boxes? What OS? Is this standard XP?
Yes its standard windows XP Professional SP2.
I was put onto this addon by another revit user. Its called "Flyakite OSX". Do a search and i'm sure you'll find it. It also patches office programs, msn etc if you want.
Refer to post on RevitCity, but yes this is still the best way i know of to achieve custom elevation markers.
I fail to see how any elevation marker style is not achieveable using this method...
The only limitation is as stated, the ability for elevation markers to be offset from there actual cut and projection lines where the section markers are obviously constrained to the cut line.
just used chris's tutorial, as usual really great. thanks.
Our firm uses sheet number on top and detail number on bottom. Unfortunately this cant be changed.
In a section marker of course you can change this...
The section/elevation tag trick works great in plan views. Any thoughts on how to get these to not appear in my elevation views? I only want to see the "real sections" that I have created. I know have a mess of section cuts(my new elvation tags) showing up in the elevation views.
Use "hide as scales coarser than" to remove from your detail views and all the others will need to have these individual section markers set in each view to be hidden by right clicking on them and choosing hide annotation.
In a few weeks this should be a little easier...
How do add this new section type to my template?
Rick,
Of course.
Just "OPEN" your revit template file ".rte" extension, make the appropriate changes and save it.
Then any new project you start with this template will have this preloaded.
Hi Chris,
This was a great tip. Just on question though - is it possible to move the "cut plane" of the section? I.e. change the location of were the section actually is taken in relation to the section head? (By default it is at the centre point of the section head)
I moved the horiz ref. plane to line up with the point of the section arrow which works OK until you rotate the section head.
Jonas
Hi Jonas,
Actually this isn't currently possible. This is the main disadvantage of this method and the main difference between sections and elevations...
Thanks Chris,
Bugger!!
I appreciate our quick response.
Looks like we finally are getting a nice summer here in Brisbane. Nice blue sky.
Cheers
Jonas
This method could really come into its own by using scope boxes. try it some time, saves mucking around with all of the sections too much.
Thats great advise, is there a way to create a section that has no reference to sheet or view? I need to make it editable for referenceing ACAD drawn details. But need a section to show on my plan.
I don't need to make my elevation tag look like the section tag, rather, I need the lower half of the head to call out both the view sheet and reference sheet - something the system family doesn't do. Any thoughts?
Unfortunately no, you can only call out the referencing sheet. I'm sure why you would need to call out the view sheet? You would be already on that sheet if you are viewing the plan with the tag in it? So I can't see why you would need to tell someone where they are already are? Maybe I'm misunderstanding...
For the other question you can use "Reference other view" and link to a Drafting View if you like?
In regards to "thebigdombrowski"'s comment.
watch this:
http://www.youtube.com/watch?v=2E2Rn3QoMjQ&feature=player_embedded#
As for me, I use the elevations as they are, but have it do the default interior elevation tag (sheet number in the circle), and It also shows the detail number in front of the arrow pointing towards the wall that is being elevated. I turned off the annoying default of having the view name included on the tag.
Many thanks for posting this, it was very helpful!
Our PM is requiring that our sheet names confirm to a really odd standard. Long story short, we have 6-8 characters per sheet, and they are spilling outside the elevation marker bubble. Any ideas on how to change the font size in elevation heads and section heads?
Also, I noticed that this string of posts says "pre-Revit 2012"....is that because elevation markers are more editable in 2012?
Hi Allison,
Actually it should say Pre-Revit 2011. I'll fix that. Prior to Revit 2011, you had limited customisation for elevation tags, but you could certainly still change the font and font size in the tag or increase the size of the circle/square.
In 2011/2012 elevation symbols were changed to be external families. They are made of an Elevation Mark, and an Elevation Mark Pointer. Depending on where you have the sheet reference label located (in the pointer or in the Mark) will decide which family needs editing. But essentially you need to edit those families, select the labels and edit their type/make a new type with a different font size. Then simply reload into the project...
HTH.
Post a Comment